Thursday, December 27

Solar-Baked Holiday Beef Pork Turkey Rolls

I hope you all have had a Merry Christmas because I certainly did. Made it easy on myself, this year, and did a lot of early preparation for the holiday meals. Having recipes on hand that will be just as tasty, after frozen, as they would be prepared the same day never hurts; don’t you think? For the Christmas Eve celebration, I wanted to bring something that would be easy to add to buffet plates, leaving plenty of room for the other goodies.
 
My original recipe, of course, was so involved; I’d need Post-Its® on my utensils. (This has been a lifelong pattern. First pair of knit socks was Argyll!) By the time of execution, it had been reduced to the most expedient method -- combining my proteins and using wonton wrappers, rather than making a pasties dough (but, for those of you who want a traditional method, I’ve included the recipe, below). I think I’m going to need the Spice Police in my kitchen because nobody stopped me and I ended up with a serious list of ingredients that just happened to turn out absolutely fabulous. Hope it doesn’t daunt you from giving it a try.
With a pound each of the ground beef, pork, and turkey, you can make up to 3 dozen rolls. Both the rolls and mixture freeze well and it’s worth making a big batch so that you have plenty on hand. Let the cooked rolls cool completely and freeze in individual wrappers to prevent them sticking together. They’ll also be ready for some quick lunches, too. You can always put them in a larger container to keep them together in your freezer.

Presoak the rice for at least 30 minutes to rehydrate and you won’t have to cook the rice before adding it to the meat mixture. If you use regular long-grain rice, presoaking isn’t necessary.
 
Gently combine ground meats in a large mixing bowl or plastic bag. Using your food processor, finely chop the mushrooms, garlic, onion, and anchovies; add to meat mixture, along with the rest of the herbs and spice, and mix thoroughly.

 Brown the meat mixture over medium-high heat in a large skillet.
 
When meat is browned, add the rice and mix thoroughly. Remove skillet from heat and allow mixture to cool.

While mixture is cooling, soften cabbage leaves by placing over meat mixture and cover.  

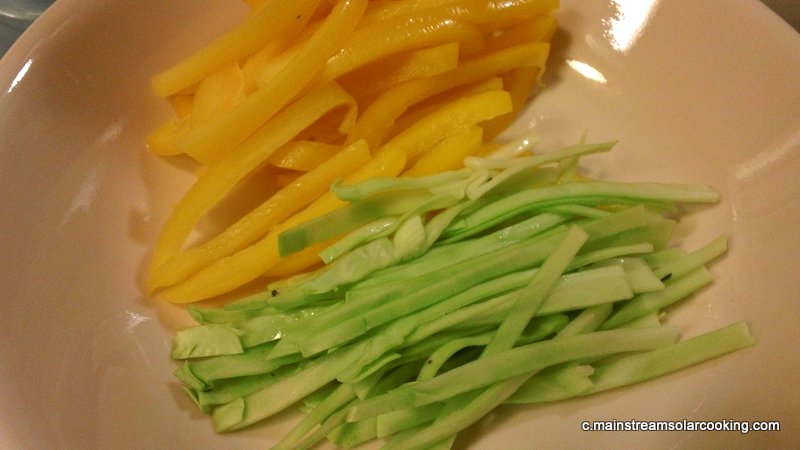
When softened, slice enough strips of cabbage and bell pepper to have at least two of each per wonton wrapper.

Place strips almost to center of wrapper.
 
Add about two tablespoons of meat mixture and create roll by bringing up corner nearest you and folding over top of meat mixture then folding over each side. Use fingertip to add water to the wonton wrapper before rolling it up toward the opposite point. (I use a mini-spray bottle and it works like a charm!) Place rolls close together on baking sheet, seam side down.

Bake in solar oven until just beginning to brown, if you’re going to freeze ahead of time. If cooking to serve, turn each roll over, return to oven and continue to bake until browned.
Holiday Beef Pork Turkey Rolls

1 lb.  ground beef
1 lb. ground pork
1 lb. ground turkey
1 7oz can sliced mushrooms
2 medium bulbs garlic
1/2 medium onion, chopped
1 cans anchovies
Juice of 1 lemon
1/2 tsp anise
2 Tablespoons fresh basil
1/4 tsp Black pepper
1/2 tsp ground cardamom
1/2 tsp ground cloves
1/4 tsp ground coriander
1/4 tsp ground cumin
1/4 tsp ground mace
2 Tablespoons fresh oregano
2 Tablespoons fresh parsley
1 tsp fresh rosemary
1 Tablespoon fresh sage
2 Tablespoons fresh thyme
1 tsp salt
1 cup sushi/basmati rice, uncooked and rehydrated (will be almost 2 cups)
5-6 Cabbage leaves, softened and cut in strips
1 bell pepper, sliced in strips
1 package large Wonton wrappers (or, pasties pastry, see below)
Olive oil

DIP:  2 Tablespoons Raspberry Mustard, 1/4 cup Honey, 2 Tablespoons Balsamic Vinegar. 

Pasties Roll Pastry:  3 cups flour and 1 stick cold butter, mixed together until resembles small peas; add egg yolk and mix thoroughly. Add 3-4 tablespoons cold water, as needed to make light dough that won’t stick to fingers. Let rest in refrigerator for about an hour. Remove and roll into 6-inch circles/squares. Prepare as above and bake.

HOLIDAY BONUS!!

Salami Rolls

These were super-dooper easy to make and everybody loved them. Thinly slice your favorite salami and score the backs so that they will bend easily. Add two tablespoons of Worcestershire sauce to four ounces of cream cheese and blend thoroughly. Using your favorite bread dough or pizza dough, divide into smaller balls no larger than an inch. Finger-press ball into a 1/8” thick circle. Place a dollop of the cream cheese mixture in the center and top with a slice of the salami. Slowly ease up and pull over the dough to seal completely and finger-press the seams. Place the roll seam side down on your baking tray or in one of those mini cupcake pans. Bake until lightly browned, freeze and/or serve. I served these rolls with some whole-grain mustard and it really makes them pop. 

Why not try these for that New Year’s get-together. They’re great fillers that help absorb those holiday drinks! 
 

Thursday, December 13

Solar Cooking is Slow Cooking – on SPEED!


One of the benefits of having a booth at Midtown Farmers' Market on a weekly basis is discovering how to help visitors understand the limitless possibilities of using the sun's energy to prepare delicious meals -- for FREE. If they have any questions, they know where to find me. Addressing the most common question of "What's the highest temperature a solar oven can reach?" has been the hardest -- not that the cooking temperature, itself, is my problem but discovering that a number on a dial is so important to this generation.   I started out on my grandmother's wood stove, similar to the one at the left that I found on Photobucket. (In fact, all my pix today were from Photobucket and then attached to my Blogger account so they wouldn't disappear.) My grandmother's stove was solid black but looked exactly like this reproduction. It was in the kitchen, never without a burning fire or coals, and helped her cook the most delicious meals and delicate desserts -- and, kept the house all cozy and warm! There were no dials or knobs on her stove, so I'm guessing the knobs you see 'opened' under the burners to expose the underside to more heat. As in real estate, cooking on old wood stoves had more to do with location and moving pans around. Folding the old longjohns over the door in the mornings provided a nice warm layer under your winter clothes, too.


So, coming from a time when most cooking was done with dial choices of "Low," "Medium," and, "High," and having worked on my grandmother's wood stove learning where the "Slow," "Moderate," and "Hot" parts were, it's hard to understand a dependence on numbers that may or may not reflect an actual temperature. 


Although older electric stove models were available, this was my first apartment stove before becoming a homeowner in the 60s. Apparently, the landlord firmly believed in the, "if it ain't broke, don't fix it," philosophy. Nothing like my mother's GE stove. Definitely a step up from the wood stove but a learning curve, nonetheless. You could move a pan from its position on a wood stove and stop the cooking. The electric stove retained heat long enough to oftentimes overcook delicate sauces and baked goods. But, we all adjusted.


My first stove from hubby had all these wonderful buttons -- still, WM to HI but, now, they had added numbers 2 and 3 for medium choices. As in the old days, trusting my eyes, nose, touch, and toothpick, told me when the cooking was done. Probe thermometers were added to my accessories, as cook books began to line my shelves. Even though recipes in print and on boxes might tell me what temperature to use, there were many times when either the recipes needed additional time or my oven's uniqueness required pan rotations to get things done. Here is a wonderful article on how recipe temperatures came to be and, as it turns out, it was a post-WWII marketing need.

So, I entered solar cooking with little or no more expectation than having my meals cooked using a different energy source.

Today, we find hundreds of Crockpot® and slow cooker recipe books available because of the convenience and discovery of just how delicious food can be when cooked at lower temperatures. This has made my job so much easier. Now, I'm able to help my visitors understand that solar cooking is best described by imagining a Crockpot® -- on "speed!" Folks from the 60s and 70s enjoy the comparison and, if you don't get it, you might have to hit the history books for a refresher.


Once my visitors know that most solar ovens (even the cardboard and tinfoil types) have a low temperature of around 200°F to 225°F and those temperatures are still higher than the national standard High of 190°F+ of a slow cooker, they become more open to the idea of solar cooking.

As an example, most slow cooker recipes give timings between 3 to 4 hours on the High setting and 8 to 12+ hours on the Low setting. If you were to prepare your foods in the same way but use a solar oven, your average recipe would be cooked in just over 1-1/2 to 3 hours at 225°F and 4 to 7 hours for denser recipes.

The majority of homemade solar oven users say that the highest temperatures reached on a regular basis are between 225°F and 275°F. Sharon Clausson, inventor of the Copenhagen Solar Cooker, has shown with oven thermometers that her oven often reaches temperatures of 350°F to 375°F. (And, I believe, in one instance when it was almost 475°F!) More often than not, she uses a combination of a cooking vessel inside a "ball" of glass bowls clipped together, creating an insulated oven chamber. Other cardboard and tinfoil ovens will reach varying degrees from 200°F to, in some instances, 300°F, depending upon the size and height of the oven and its reflectors. Sharon Cousins, inventor of the EZ-3 Solar Cooker , can alter her oven temperatures by the size of the box corner used. In all cases, however, these temperatures can only be achieved by either placing the cooking vessel inside an oven bag or enclosing the open side of the solar oven in double (for best results) oven bag layers to create the baking chamber environment.


Commercially-built solar ovens available today are insulated and reach very high temperatures. The Global Sun Oven® boasts a potential high of 400°F; but, as with conventional ovens, once the cooking vessel has been placed inside, the temperature drops almost 15 to 25 degrees, not returning to the higher temperature until both the food and vessel have equalized in the cooking chamber. Foods placed in a Crockpot® are heated to the full height of the food from the outside in and it isn't until the center has reached the same temperature that cooking begins. Foods in a solar oven cook from the top down but that environment is easily changed by either placing the vessel on a heated base or preheating the foods through recipe construction, hot liquids, and/or the microwave to get the process started. If you're cooking away from home, you are restricted by the environment and should expect longer cooking times. Regardless of time of year, the best solar cooking time is between ten a.m. and two p.m.


The most obvious difference between a commercially-built solar oven and a slow cooker is that solar cooking is FREE, every time. And, you know how I love that! Solar cooking is a moist environment with little, if any, evaporation. Even though you can leave food unattended in a slow cooker, most do not stop cooking until they are manually turned off or unplugged. The food can be overcooked, dry, and even burnt, as the liquid evaporates. It is very difficult to overcook or burn recipes that are solar-cooked. When the food is cooked, the temperature will drop to a warming temperature from 180°F down to 150°F until you retrieve it. I believe it's condensation that forms on the underside of the oven door when the food has been cooked that causes enough filtering of the solar rays to turn the oven into a retained heat chamber.

This is why I don't worry about the cooking temperature in my solar oven because I know the food will be cooked at a temperature much higher than the average slow cooker. Unfortunately, it's very hard for today's conventional cook to accept that, until they've personally experienced a solar-cooked meal. In my opinion, every family should have some form of solar oven available for nourishing hot meals during long-term power outages to feed their families, to pasteurize their drinking water, and, if necessary, to sterilize utensils.

In trying to bring solar cooking to the mainstream, my sincerest wish is for the home cook to make it an accessory appliance as opposed to an adversarial product that has to keep proving itself. Every new appliance has its own learning curve and comes with a booklet not only describing its use but includes recipes to help the consumer discover the potential. That's all I'm asking, is that you give a solar oven the same opportunity. There will be days when using the sun to cook your meals will not be feasible and my suggestion would be to use those appliances that draw 110 volts, if possible. It's all about saving money, reducing fossil fuel usage, and feeding your family healthy and nutritious meals. And, you know what? It's still the best kept secret from the mainstream cook.  


Saturday, December 8

Tallow 2012 – Too Late Smart!


An expression I've heard all my life is "too soon, old; too late, smart." Applying that to my own life has been as normal as breathing and I'm always tickled when it's SO obvious – after the fact. A perfect example is this winter's tallow rendering. Oh, yeah, 'too late, smart,' rang loud and clear in my kitchen and has only taken about 40 years (something, I never thought I'd live long enough to be able to say!). To save you the same fate, I will now share my discovery with you, although, I'm sure many others have already figured this out and only have to look forward to, 'too soon, old.'


It was time to render suet into tallow. In gathering the needed equipment, I was hit with a fantastic idea – why not use oven bags to keep everything neat and tidy! "Eureka," (an old-fashioned "duh!") I said, giving my forehead a palm slap. Working with large amounts of fats can be messy and, when heated into a hot oil, very dangerous. I decided to give it a try.

Here is an example of suet from the butcher. It is taken from around the organs of venison, cattle, or sheep, and not from around the muscles. It has a creamy texture, is a soft white, and will break apart, unlike muscle fat that looks bubbly and comes off in strips. Pork suet renders into lard and poultry suet into schmaltz. You can find out more in this posting in my primal post!


If you don't have direct access to suet, most meat managers are more than happy to save/order it for you. A word of warning: make sure you find out how many pounds the manager has to order for a basic order from the supplier so you don't end up having to buy forty pounds more than you need. In the cool months, you may find that your local market has it on hand because so many people like to mix wild bird seed in suet. It not only prevents the seed from spreading all over the yard, suet is the only fat birds can digest. They come in one-pound sealed packages and cost under a dollar. Even though you may be able to cook with fresh suet, if not rendered, it will spoil and get quite nasty. Rendering and straining out the connective tissue and small bits of meat leaves you with clear tallow that will harden and last for a very long time at room temperature. Freeze or keep it in the refrigerator in an airtight container and it can last for a couple of years.

The most important thing to remember is that you want to reduce suet to liquid, you do not want to cook it. You need to maintain a low temperature.  If your oven won't let you bake lower than 190°F, try a temperature of 200°F and keep the door opened a crack. If you don't have a solar oven, go with the slow cooker. Depending on how much suet you are working with, rendering can take anywhere from 8 to 10 hours, which is way too much energy usage, for me, and is the perfect job for the solar oven. I had 15 pounds of suet and used three pots – one in the Global Sun Oven® and two in the SolarChief® and had them in the ovens by 9:15. This amount will be enough for the next two years, as I do very little deep frying and only use tallow for sautéing. One pound should render enough tallow to last you for a month, or two.


You'll want enough cheesecloth to completely enclose the suet. If you don't have access to high grade cheesecloth, use at least three layers of the kind you can get at a craft store or the market. Lay the cheesecloth over the pot and add the suet a piece at a time so that it will take the shape of the pan. Secure by knotting or using rubber bands/string so that it doesn't come apart in the pot.

SECRET REVEALED!!!


Lift the cheesecloth bag out of the pot and gently place it down so that it doesn't lose its shape. Position an opened oven bag (DUH!) in the pot and then place the suet bag inside, being careful not to change its shape. Twist and tie the oven bag closed. As I wasn't the least bit worried about the bag exploding at such a low temperature, I did not add flour to coat the inside. Now, go read a book or clean out the attic!


When the suet is liquid and just starting to bubble around the edges, it's time to remove it from the oven and strain your tallow into its final container. This is when the 'too late, smart' comes into play. I used tin foil to line and raise the edges of standard-sized loaf pans. The next step requires total concentration to prevent oil from squirting all over your kitchen. Using pot holders or a kitchen towel around the tied section of the oven bag, raise the oven bag just enough to allow you to pierce the BOTTOM with a sharp knife or ice pick to let the oil flow into the same pot while automatically straining through the cheesecloth. Keep the holes as close to the bottom as possible. Hot arcing oil is not fun! This will take a while and you will need to make sure those little pointy side bag edges don't sneak out of the pot. When most of the oil is in the pot, begin rotating the oven bag as much as you can to squeeze out the rest without popping the bag. Don't worry. There'll be plenty of oil for you to use.

IMPORTANT! Discard the drained oven bag and any drippings into the trash, NOT YOUR SINK DRAIN. Tallow gets hard at room temperature and will stop up your drains so, please, don't think 'just a little bit' won't matter.


Slowly pour the tallow into the loaf pan and let it do its thing.


Before long, your tallow is ready for use and/or storage. There will be some oil that escaped and hardened between the foil and the pan. Have another large piece of foil ready and transfer the tallow loaf. Seal the first foil cover and then seal the second around the first. It's ready for your shelf!


The third pan of tallow was transferred into a standard fat pot (available in any housewares department) and fit perfectly. The top is not smooth because of the scrapings from the other pans. But, because even the smallest amount of tallow can make your recipes pop, I like to save every bit. Tallow will remain safe and hard at room temperature, but I prefer to keep mine in the refrigerator.


I can't believe how easy this job became by using the oven bag. (Another palm slap to the forehead!) You may wonder why it wasn't done directly in the loaf pans or fat pot. It can be, if you're rendering a pound at a time and you cut down the oven bag. You want to make sure that there is enough room above the actual suet that, when you lift your bag, the leftover suet is still below the top side edges. Why not pierce the bottom holes in the oven bag, to start? Because the oil will run up the sides and possibly overflow because of the bulk during rendering and make it very unwieldy to strain.

BUT, using the cheesecloth inside an oven bag has made tallow-making a snap! If you've checked out my first posting on rendering fats, you can see how many steps have been removed from the process. I hope you'll give it a try and share your results with us.


Monday, December 3

Turkey Gizzards End Round One of Holiday Cooking


Phew! This has been such a busy period and I've been terrible at posting. I apologize and hope you haven't given up on me. To make up for it, I do have a confession about something I have done these many years, though. You see, at Holiday time, I keep the turkey heart, half the gizzard, and the juicy tenderloin, all to myself! Oh, yeah. I consider that one of the perks of being the cook and do not feel the least bit guilty.  Just finally confessin'. Of course, when making gravy, I will add the precooked liver, other gizzard half, and some turkey neck meat to make up for the "missing" protein. Tee hee hee.


You can find any number of ways to prepare turkey gizzards online and you should try them all. But, one of my favorite ways of introducing them to folks who have been denied this tasty treat is to slice, Southern fry, and braise them. As with most tough proteins, the slower the cooking, the more tender the meat, making it the perfect candidate for the solar oven. One turkey barely gives you enough to make giblet gravy (and, feed the cook in the kitchen!), so keep your eyes open for packaged gizzards at the market. They are very economical and you should be able to pick up a pound for under three dollars.

As you know, I'm a firm believer in washing my packaged meats, regardless of how much I'm told that it's no longer necessary. Not every recipe requires slicing the gizzards but it will definitely create a tenderer treat for first-timers. Personally, I love the natural texture and braising does the job for me. Regardless of choice, whole or sliced, you will have to remove the tough membranes before dropping the gizzards into your breading mixture. I used flour, salt, pepper, basil, parsley, and garlic salt.  Gizzards are not perfectly round but can still be a challenge on the cutting board, so please be very careful. One trick I use is to pierce the gizzard with a dinner fork so that my slices are even and my hands are nowhere near the knife.


 Sauté in olive oil/tallow over high heat in a heavy skillet and then transfer the gizzards to your casserole dish. Add the wine, water, and butter to the skillet; bring to a high simmer while scraping the little bits and pieces into the gravy. Pour over the gizzards; cover and bake in the solar oven for one and a half hours or until all liquid is absorbed. Serve with your favorite sides. I used Basmati rice and corn because the breading mixture was very spicy and I didn't want to overwhelm my poor little taste buds.

Okay, it's official. I HATE green plates. Thought I'd take advantage of a sale and am really sorry. Just sucks the life out of a meal; don't you think?

I hope you'll give turkey gizzards a try because I just know you're going to like them. And, by all means, feel free to let us know what you did and give us a link to your recipe!


Monday, November 19

Solar Baked Crab Chowder

Alas, the Midtown Farmers Market is closed for the winter break, but it has been a fantastic season. For our final two Saturdays, we were blessed with beautiful sunny mornings and bright blue skies as we said our goodbyes to our regular visitors. My canine friends made sure to drop by for their farewell organic doggie treat and promised to see me again in the Spring.


Even though the last two Saturdays were bright and sunny, I had to stop cooking because sunrise had moved to almost behind my booth. (There's nothing like solar cooking to become familiar with just how fast that old sun does move across the sky!) But, winter weather is on its way, make no mistake. As we were closing this past Saturday, the predicted cloud cover moved in over the sun and we ended up with a cloudy, rainy, weekend, as predicted. More importantly, both the Market and the 66th Annual Raleigh Christmas Parade was blessed with gorgeous weather, and the holiday season was properly launched.


Lower temperatures have begun to creep into NC and it was so cold two weeks ago that I couldn't wait to get home to make a thick hot solar-baked chowder. I knew there would only be a few hours of sun left and I probably wouldn't get anything into the solar oven until at least two o'clock but it wasn't the outside temperature that worried me. I just knew the sun would disappear over my rooftop by four o'clock, so I had to hustle and also give my oven some help. That meant making sure both my liquids and dense vegetables were zapped in the microwave to get everything up to the heat of the solar oven so there would be very little drop in temperature.


A favorite winter pot is my oval four-quart covered roaster. By spreading the contents and lowering their depth, the sun doesn't have to work as hard and the cooking time generally stays below two hours. When it was time to put the chowder in the solar oven, the temperature was 275° F.   The chowder recipe is one I've been using for more than 40 years, changing ingredients on a whim, and I really can't recall the original source. But I did try to pay attention to what I was doing, this time, and the following recipe is what I used.


Solar Baked Crab Chowder
8 ounces chopped crab meat (canned or imitation)
3/4 cup white fish, cubed, (firm not flaky -- cod, flounder, tilapia, etc.)
3 ounces chopped clams (optional), reserve juice
1 1/2 cups cubed white potatoes (red potatoes won't dissolve)
1/2 cup kernel corn
1/2 cup chopped cabbage (the firm white part, not the leaves)
1 medium chopped onion
2 cloves garlic, chopped (optional)
1/2 cup of white wine
3 tablespoons butter
1 teaspoon salt
1/2 teaspoon black pepper
1/4 teaspoon anise
1/2 teaspoon dill seeds
1 teaspoon chopped parsley
1 1/2 cups fish stock or water (use juices from any canned items)
3/4 cup evaporated milk (whole milk or cream)


Combine all ingredients in stockpot, reserving milk until near end of cooking time. Cover and place in solar oven for approximately one and a half to two hours; remove from oven and stir in milk that has been zapped in the microwave; return to solar oven for additional heating, if necessary. Serve in bowls or mugs with a garni of parsley and/or paprika or a pat of butter and your favorite bread or crackers. This is a thick chowder. If you prefer a thinner broth, simply add more liquid.


Most of you know that I adore cabbage and always look for ways to use it in my cooking; but, if you don't feel the same, you can use celery, chard stems, bok choy, whatever, for a 'crunchy' green vegetable. It's fun to try different things and I hope you'll try my recipe. Just be as creative as you want and you can enjoy original baked chowder every week!


Tuesday, November 6

Roasted Chicken Thighs and Corn on the Cob


Well, we've officially entered Fall and the days are getting shorter. But, with just a little planning, there is still enough sun to bake a delicious meal. Knowing what I was going to cook the night before, the food was placed in the solar oven by 11:30 a.m. I had errands to run and came home to a cooked meal around four p.m., So, I'm not exactly sure when the actual cooking was done.


It was the middle of the week and comfort food was my goal, to help take the bite out of the air. Oh? Did I not mention that the temperature had dropped considerably, as well? It was enough to make me put my jacket in the car, let me tell you.

Roasted Chicken Thighs

6 deboned chicken thighs
2 T olive oil
1 tsp salt
1/2 tsp black pepper
1 cup chicken stock
1/8 tsp anise
1/8 tsp mace
1 tsp basil
1/8 tsp cream tartar
2 T flour
2 cup chicken stock
1/4 cup heavy cream

Preheat solar oven to 225F   Use covered pan

Place olive oil, salt and pepper, in casserole rotate chicken thighs until covered. Add chicken stock, anise, mace, basil, and cream of tartar; stir to blend, cover, and place in solar oven.

When chicken is cooked through, prepare a roux with 1/2 cup chicken stock, 2 T flour, and 1/4 cup heavy cream and heat thoroughly in microwave or over med-high heat in a saucepan. Add broth from cooked chicken to finish gravy. When flour is cooked, add chicken thighs to gravy and serve.

Solar Roasted Cob Corn  

6 ears sweet corn
1/4 tsp olive oil
salt
pepper
6 sheets tin foil

Place foil shiny side up on flat surface. Spread olive oil over center, add salt and pepper, roll ear in mixture, and create a sealed packet with foil.  Place in a single layer on tray and bake in solar oven until done. 

Everything turned out moist and delicious, and cooked to perfection. I can't even begin to describe the corn without becoming disgustingly rapturous. The kernels were permeated with flavor and full, tender, coming off the cob at the slightest bite. I attribute it to the slow, gentle, solar cooking, and will definitely do it, again.


Playing with the herbs and spices resulted in a new and delicious flavor . The gravy was just thick enough to serve over rice or noodles without being runny. I hope you'll give it a try.


Tuesday, October 23

Rosemary Chili – What?


Dehydrated COOKED Pinto Beans
This idea came to me after I made some Sicilian-styled spaghetti sauce suggested by my friend Joyce at Octoberfarm.com. It was absolutely delicious and, as usual, I had leftovers. What to do - what to do? The small problem was that I didn't have enough to actually make a meal for two people; but, I did have enough to act as a base for a different dish. Shades of Wendy's! (They make their chili from leftover burgers.) "Let's make a chili," I said to my dog, Angel, who amiably wagged her tail and make me feel terribly smart.


Now, if you took a peek at Joyce's recipe, you know she starts by steeping her Rosemary in a quart of warm water for a couple of hours. Boy, is that a great step. I hope you try it. The only difference between her recipe and mine for the spaghetti sauce was that I didn't have two pounds of ground beef on hand, so I ground up two pounds of top round steak.


To make my chili, I added one small can of tomato sauce to the one and a half cups of leftover spaghetti sauce, one small can of kernel corn, a tablespoon of tomato paste, and a cup and a half of dehydrated cooked pinto beans. [NOTE: it's worth repeating that I used dehydrated cooked pinto beans and not simply dehydrated beans. If I had just used the dehydrated beans, I would've had to soak them overnight and then cook them before adding to my chili. Because the pinto beans had already been cooked before being dehydrated, they rehydrated during the cooking.] But, because of adding the beans, I had to add an equal portion of liquid and used a cup and a half of leftover Rosemary water. The Rosemary Chili was born!


Everyone who tried it at Midtown market said they enjoyed it and, of course, added that they would have never thought of doing it, that way. Frankly, neither would I, had I not had the leftover Sicilian spaghetti sauce. Thank you, Joyce, for opening a whole new culinary door for me.


Monday, October 15

Faux Pumpkin Pie - Solar-Baked

Here we are, just a few months away from planning holiday meals with friends and family. I think we all have our own special recipe for a family favorite -- pumpkin pie. But, diid you know that if you find you have forgotten to pick up some canned pumpkin or a fresh pumpkin, you can still enjoy pumpkin pie with your meal? No, I don't mean send someone out to the store to buy one from the local bakery. I mean, if you have some carrots on hand, you can make a faux pumpkin pie that is almost indistinguishable from the real thing. And, the bonus is that it's even healthier for you!

It was pie baking day at the Midtown Market and I decided to make the faux recipe and test people's reactions to it. Well, friends, it was thumbs-up all the way! I even had one lady who told me, if I had a license to sell my pies, she would have bought three on the spot. This recipe came from one of my favorite web sites, Pick Your Own, and it was super easy. I decided to make two pies, stacking them, in the solar oven but having a crust in only one pie so that folks who were allergic to wheat would be able to have a taste. By the way, the Pick Your Own site is chock-full of great substitution recipes and a great one to have bookmarked for future reference. The recipe given on the site is meant for all countries and has all the conversions etc. needed. I was Booth #3 for the voting and won't know the outcome until next Saturday.


Faux Pumpkin Pie

Three cups cooked carrots; puréed down to two cups
1 cup sugar
2 teaspoons ground cinnamon
1 teaspoon ground allspice
1 half teaspoon ground cloves
1 half teaspoon ground ginger
1 half teaspoon Mace
1 half teaspoon vanilla extract
1 half teaspoon salt
4 large eggs
1 can evaporated milk, 12 ounce size

Preheat solar oven to 225F. 2 nine-inch pie plates and enough of your favorite pie crust pastry to make a bottom crust in each pan. I used four of those disposable foil pie pans and binder clips in the solar oven.


Combine all ingredients, pour over pie crust; cover, and bake in solar oven for approximately 45 minutes or until pie has firmed up a bit. While pies are baking, prepare a topping of one-half cup pecans with one-eighth cup butter and one-quarter cup brown sugar in a saucepan over low to medium heat and let the butter sizzle enough to caramelize the sugar.


I've stacked the pies and had the solar oven raised on its extended leg to get the earliest sun possible in its Fall trajectory. Because I was at the Market, I had the topping mixture in a plastic bag inside a pint-sized canning jar in the EZ-3 solar oven at the left and let the topping melt at the same time, so it would be ready and easy to pour when the pie firmed up. (You can almost see the butter stick.) Then, you just sprinkle the pecan topping over the firmed up pie; cover, and finish baking. Pie is done when a clean knife inserted in the center comes out clean.

I think this may be my last day to actually cook at the Market because we close at noon and the sun has moved so far from the Spring position that it's almost 9:30 a.m. before it hits my booth, leaving almost no time for cooking and sharing samples. I think it's time to re-introduce my visitors to the beauty of the Wonder Box Cooker and heat retention cooking, don't you?

I do hope you'll give this recipe a try and discover just how delicious it is before you serve it to your guests. Then, you can see if they can tell the difference. We'd love to know what happens! Keep your fingers crossed for me and I'll let you know what happened in the pie baking contest.


Sunday, October 7

Liquid Sunshine Makes Gods Laugh at Midtown Market 9/29

You would think, after all these years, that I would understand the Laws of the Universe – that is to say, the gods are only waiting to hear your plans, to give themselves a good laugh. This has been a great year at the Midtown Market at North Hills, with plenty of sunshine for solar cooking. But, on September 29, it was going to be a special day for mainstream solar cooking, with local television taping. So, it only made cosmic sense that Mother Nature would pick that day to flex her muscles and favor us with nonstop liquid sunshine (more commonly known as 'heavy showers')

The reporter and I had already agreed in advance that we'd be filming like the cooking shows, with a finished dish ready for the viewers, following the taping of the preparation steps. The sun shone bright on Friday and I solar cooked my recipes the day before so everything was at the ready. Well, Saturday, the rains put a stop to our plans and the taping was called off. On the bright side, there was plenty of food to share with family and friends -- a treat that doesn't often happen on market day.

They had my version of mini-Pigs in a Blanket, Roasted Onions with Lobster Stuffing, and Eggplant Wrapped Noodles. Now, wouldn't that have made a wonderful presentation for the TV viewers! In any event, I've decided to share the recipes with you and hope you like them.

Pigs in a Blanket – these were the easiest to make. I used some left over bread dough that I rolled into logs and then cut into 48 one-inch pieces. One pound of cocktail franks, each cut into thirds, was put in a large Ziploc bag and shaken in a combination of 2 tablespoons tomato powder, 1/4 teaspoon chipotle pepper, 1/2 teaspoon powdered onion, 1/4 teaspoon powdered yellow mustard, and 1/2 teaspoon sea salt, until the franks were evenly coated.


Each piece was then inserted into a dough ball, deep enough to prevent it from popping out while baking. (It doesn't hurt to pinch the dough across the top so that the frank is just visible because it will emerge as the dough bakes.) For softer hors d'oeuvres, place each dough-wrapped frank an inch apart on a parchment paper-lined baking sheet. The ones in the picture were pushed further down into the dough because they had popped pretty high by the time the whole muffin tin was filled.  I prefer using muffin tins for solar baking and crunchier crusts. Place in a 225°F solar oven and bake for approximately 40 minutes or until the crust is golden brown.

Roasted Onions with Lobster Stuffing – peel and core six medium-sized sweet onions, leaving approximately 1/4 inch for the onion shell and slice just enough off the root end so that it will remain upright in the baking pan.


In a medium bowl, combine 8 ounces chopped lobster, two medium shredded zucchinis, 1 cup finely chopped leeks (white bulb only), 4 ounces feta cheese, 4 ounces ricotta cheese, 1/2 cup Panko crumbs, salt and pepper to taste.


Fill center of each onion with mixture, wrap bottom of onion with a piece of tin foil or use a foil muffin cup to hold juices and place in baking pan. Cover and bake in preheated solar oven at 225°F for approximately 2 1/2 to 3 hours.


Eggplant Wrapped Noodles Рthis is a multi-process recipe but, oh, so worth the effort because it makes such a beautiful entr̩e. You can use any long flat wide noodle that you want, but I like using those frilly lasagna noodle edges. You'll need to precook the noodles just to the al dente stage and then trim off the edges, saving the wider noodles for other dishes. Slice two medium eggplants in quarter inch slices from stem to blossom end. (The skin of the eggplant can sometimes be very bitter and you may prefer removing it entirely.)


Fry each slice on both sides for approximately for 2 1/2 to 3 minutes in 2 tablespoons olive oil and place on paper towels to drain.


Spray your baking pan with oil and cover the bottom with your favorite tomato sauce. While each rollup should have five strips of noodles, lasagna noodles can be quite thick and four is more than enough. Divide your noodles so that you have enough for each eggplant slice. Arrange noodles crosswise at blossom end of an eggplant slice and roll towards stem end; place seam side down in baking dish. Place as many rollups as you can in the baking dish without causing any of them to pop above the others.
 

Add a tablespoon of sauce over eggplant part of each rollup, cover pan and bake in preheated solar oven at 225°F for approximately 1 1/2 to 2 hours.


A very wet day, indeed. My shoes were soaked and cuffs rolled. See?


But, 'tis an ill wind that blows no good, at all, and we ended up with some delicious recipes; don't you think.


Monday, October 1

Curried Meatballs and Summer Veggies over Rice


One of the first meals I've baked in my SolarChief(R) mainstream solar oven. It's very hard to take pictures of both the oven and the baking because it's big and there's so much reflection -- and, I'm not a photographer! I changed the handle location so that there would be no difference between the standing and wall units. Fantastic result! Reflectors are easily removed but stay firmly locked in place on windy days.


Curried Meatballs and Summer Veggies over Rice

Half bag of ready-made meatballs, defrosted
2.5 cups hot water
1/4 cup tomato powder
3 large cucumbers, pared, seeded and diced
3 medium pattypan squash, cored and diced
2 banana peppers, seeded and diced
2 poblano peppers, seeded and diced
1 medium onion, chopped
1 T worcestershire sauce
1 tsp sweet basil
1/2 tsp mint
1/2 tsp curry powder
1/4 tsp stevia

Preheat solar oven 225F   Covered baking dish

Brown meatballs (if desired) over med-high heat in heavy skillet. Remove and place in baking dish. Return skillet to heat and saute onions and peppers until onions begin to sweat; add cucumbers and squash and heat through.  Pour over meatballs.


Use microwave-proof measuring cup for water; add herbs, worcestershire sauce, and spices; stir and microwave on HIGH for 3 minutes. Pour over ingredients in casserole. Cover and bake in solar oven for 1.5 to 2 hours. Serve with your favorite noodles or rice.


Friday, September 21

Burrito Lasagna - Solar Baked


One of my favorite food bloggers created a burrito lasagna. I'm going to keep looking for her and give you a link; but, as soon as I read her post, I knew I couldn't wait to try my own solar version. This turned out even better than I expected, so I'm going to share what I used in my recipe and then you'll be able to compare them when I find her. Aaarrrgghhhh! This is a wonderful alternative to regular lasagnas and something I'm sure you and your family will love and enjoy over and over, again. Totally unexpected and an instant keeper. NOTE: Tada! I found it. Mexican Lasagna at Sugar & Spice by Celeste! Check it out. She uses tortillas instead of lasagna noodles.

Burrito Lasagna
Lasagna noodles for three layers, precooked to just under al dente.
1 cup kernel corn
10oz pre-cooked pinto beans, or 1- 10oz. can
1 T olive oil
1 medium onion, chopped
4 banana peppers, chopped
2 poblano peppers, chopped
1/8 tsp chipotle pepper
1/8 tsp stevia
1/2 tsp salt
1/8 tsp black pepper
3/4 cup tomato sauce
1 cup cheddar cheese, shredded
1/2 cup mozzarella cheese, shredded
1/4 cup Parmesan cheese

Preheat solar oven to 225°F                        Lasagna pan, lined with tin foil.

Prepare lasagna noodles per instructions on package. Let cool. Beans will have to be ready for a final cooking stage, so either cook the day before or used canned pinto beans. Sauté onions and peppers in olive oil. One layer of noodles on bottom of pan, then, beans, corn, onion-pepper mixture;


tomato sauce mixed with chipotle pepper, stevia, salt and pepper; spread with 1/2 of cheddar cheese; repeat layers; top with layer of noodles and mixture of mozzarella and Parmesan cheeses.


Cover with foil and bake in solar oven for approximately 1.5 to 2 hours. Remove cover and continue to bake until cheese has browned slightly and knife inserted in center comes out clean.


 Serve with crusty bread and your favorite wine. Enjoy your Mexican-Italian meal!

I made the beans the day before and had tripled the recipe so that I would have enough to dehydrate for later meals. While you don't have to precook most foods to dehydrate, they will rehydrate faster if you do and it makes them so much more convenient for folks who like to camp and want a quick meal. 


I don't know if this combination has intrigued you. I hope so because this is so close to a burrito and a delicious surprise for those expecting standard lasagna! I suppose you could use corn tortillas between layers but the noodles are a great change and well worth the doing. Let me know if you try it and I'll keep looking for the original poster.


Related Posts with Thumbnails

Copyright

MyFreeCopyright.com Registered & Protected